
|
|
Here you will find some basic information about the steps used to go about cooking your meat on the grill
or in the smoker. Over the years techniques and procedures have evolved for achieving the best
results. This page addresses Chicken, Ribs, Steak,
and Pork.
Injection
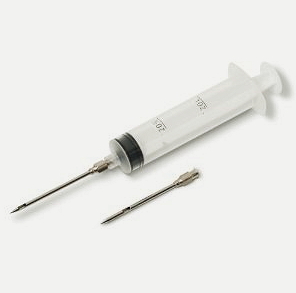
Today injector syringes for pumping flavored liquids into meat such as
Pork, Poultry, and Red Meat are more common and inexpensive. These are handy items to own
and can around the Holidays even be found at the Dollar Stores.
When inserting the needle into the meat, the plunger is
pressed until the meat begins to swell at the needle. Then
the needle is reinserted into another area about 1 1/2 inches away. This can even be used with links of sausages.
Instant Read Thermometer
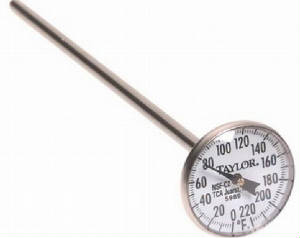
One of the most important things a Grill Master can own
is a good Thermometer. The idea is to measure the temperature at the center of the meat to know it has
reached the "safe" temperature. A simple test of a thermometer is to dip it in a glass of ice cubes and water to
see if it reads at 32 degrees within a few seconds. If it is more or less by a few degrees, then
make an allowance of that much when you measure the
temperature of the cooked meat.
Because, if you have the temps right then it is safe to eat and "It's done", so pull it off the grill or out of
the smoker and let it rest a few minutes before serving it.
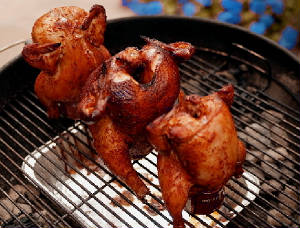
Beer Can Chicken
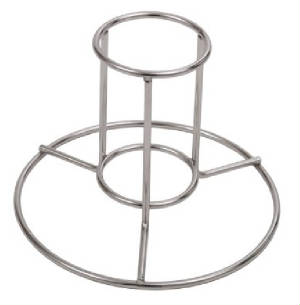
In recent years whole chickens which have been grilled, baked in a Kitchen Oven, or smoked in a Smoker grill
have become wildly popular. You simply have to try one
of these to believe it. There are small Beer Can holders
on the market at very affordable prices where the Can is
inserted and the Whole Chicken is mounted upon the can.
This heats the Beer and steams the Chicken from the inside while the outside cooks. The result is a very tender
and flavorful bird.
The outside of the bird is rubbed with a blend of herbs and spices and the Beer Can may have some of the Beer poured
into a glass before some of the rub is added into the Can to flavor the Beer so the steam will be more savory.
3 2 1 Ribs
One of the more Popular BBQ & Smoked Grill foods are
Ribs. But it can be very frustrating for those who are new to BBQ grilling. Either they come out
as tough as shoe leather or they are underdone. So lets look at one of the
more popular processes for making the best ribs that are
tender and juicy.
The 3 2 1 method is a three step process where the ribs
are heated for 3 hours, steamed for 2 hours, and then
heated once again with BBQ sauce applied to them for
one last hour. But before the Ribs go on the grill there
are some necessary steps to take to get them ready.
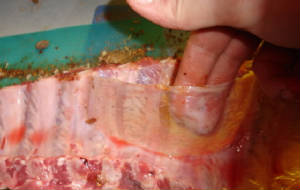
First the membrane on the inside of the Ribs needs to be removed. This is like a tough plastic wrap and it can be loosened
with a paring knife. Then using paper towels to get a good grip the membrane can be stripped from the rack. Now
they are ready to go into a Brine for a minimum of 4 hours and best over night for around 8 or 10 hours. But it
is best to try to keep it closer to 8 hours.
Once the Ribs are removed from the brining bag and the brine discarded, the Ribs can be patted dry with paper towels.
Some Grill Masters use inexpensive Dijon mustard
as a coating on the Ribs and then sit the ribs in the refrigerator for about a half hour so it will become quite sticky.
Next the Ribs will be coated with your favorite rub.
The Dijon mustard is bland and it won't be noticed like a
regular prepared yellow mustard. (which you don't want to use for this) With the grill or smoker heated up to about
225 to 250 degrees F, the Ribs can be placed on the grill.
The idea is to use low heat for a long period of time to cook in this manner. It is highly advisable to have a
small
thermometer which can be inserted into the center of the meat to get an accurate reading.
After 3 hours the Ribs are removed from the heat and wrapped in aluminum foil with some liquid such as apple juice or
other flavorful liquid to steam the Ribs. The foil should be double wrapped and check to see if there are no leaks.
The Ribs are returned to the grill for 2 more hours now.
Be careful not to bend the rack of ribs as they may break in half. Serving a full Rack of Ribs is very appealing
to the eye and most Grill Masters want to cut the finished ribs at the time of presentation.
With the Ribs removed from the Foil and cooled a bit, it is time to apply a thick coating of BBQ Sauce. Just use
your favorite or any of the recipes the site has included for this purpose. This will be returned carefully to the grill
or smoker to heat for one more hour in which time the moisture in the BBQ sauce will evaporate leaving a thick
and dense coating often called a "bark". It may char just a bit which may add to it's appeal but do keep the temps
to around 200 degrees F in this last hour and check the
progress frequently. If the Ribs appear to be charing you may wish to lower the temps or remove them. The
sugar
in the sauce will char easily so be aware of the temperatures.
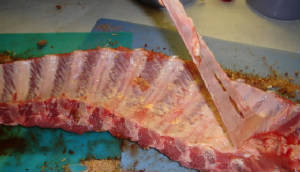
The first photo shows separating the membrane from the inside of the Ribs. The second one pulling the membrane
from the Rack of Ribs. If left on and cooked it will be more difficult to try to eat the meat from the Ribs and
distract from the enjoyment of them.
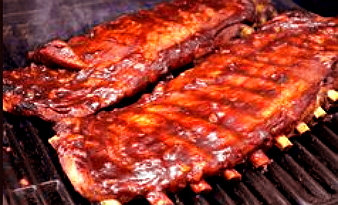
The last photo shows what you should wind up with after 6 hours on the grill. Notice how as the Rib meat cooks
it draws back from the end of the bone. This is the "money shot" photo. If you can arrive at a finished Rack of
Ribs like this, then you are worthy of the title Grill Master.
Steak Grilling Tutorial
A Tutorial for beginner....even the girls should try this
So where does it all start to grill a steak. You don't have to have a $300 dollar grillor expensive exotic equipment
or all kinds of gadgets for this and just a simple charcoal
grill will give good results. It isn't the expense of the equipment
so much as knowing how to cook with it. Simple things can give big results when you know what to do with them.
First you need to have a charcoal grill. There are many models of these from the el cheap-0 items from the Giant Dollar
stores which range from $10 to $30 dollars. These are really low end items and will last only a few seasons if well taken
care of. You may find a tri pod grill which has a 18 inch round grill which only requires a screw driver and pair of pliers
to put together, or kettle type grill which has a cover. There are table top versions of these and even the square "hibachi"
style grills which require no more effort or tools either.
A small bag of charcoal will be needed but you can find deals a few times a year on the 25 pound bags for $8 dollars
or so. Some charcoal is EZ Start such as Match Lite but it contains chemicals which make it easy to ignite. I use shredded
bits of news paper and some small dry twigs I pick up to start a small "starter fire and stack up charcoal briquettes around
it to get them started.
The looser you pack the charcoal the faster it will ignite and hotter it will burn, but you can
re arrange it later with a pair to kitchen tongues and pack it a bit closer once it's ignited. Once the charcoal has
reached a red glow with gray ash and is predominately gray in color your fire is ready to cook with. You only need mount your
clean grill over it and use a folded paper towel held in a pair of tongues & dipped in a little vegetable oil to wipe
the grill
once it is hot. Then you are ready t place the meat on the grill.
As for the Steak. Assuming you are now with the basic skills of firing a grill, lets look at what you need to know about
purchasing, prepping, and cooking the Steak. It isn't that difficult. There are some things that you need to understand, however,
and we'll try to get you up to speed
here. First when you go to the store and find your way to the meat counter where
the Beef Steaks are, there will be several cuts of steaks. Some are expensive and others much more affordable. The more affordable
ones may not be as flavorful in their natural state but we can deal with that in a minute. First all meats come in Grades
which are designated by the USDA Government Standards.
Today 66% of the fresh red meat and poultry we find in the store
is is prepared off site in large packaging plants. Only a third of the meat is cut behind the counter for a customer and most
of this meat is of the grades "Choice" or the next step in affordability, "Select". To find the
top quality you'll need
to find a specialty butcher shop or a better grocery store which offers "Prime" cut.
Next your steak you choose should be at least one inch thick but not more than two inches. The better steaks are the
thicker ones. Where the steak comes from on the animal will determine how good a cut of meat it is for a steak.
Some parts of the animal will make better steak choices.
On the top of the cow from the Rib, Loin, Sirloin, and Tender Loin you'll be getting better steaks.
The Rump will
likely be where your affordable Round Steak is taken from. The Chuck over the shoulder
may have gristle or connective tissue
through it and be better suited for other kinds of cooking.
The Rib Eye Steaks are taken from the Rib cut section. The T-Bone and Porterhouse come from the Loin
and Tender
Loin sections. The Filet Mignon will generally be taken from the front end of the Tender Loin which extends into the Loin.
This is generally an expensive cut served in a small portion. Although it is expensive, it isn't always that flavorful
and that's why it's often wrapped with a piece of bacon. Women often like delicacies that come in petite sizes and cute presentations.
Chateaubriand is the next cut aft of the Filet Mignon. The Tender Loin further back may have connective tissue in
it and not be so good for grilling. Round steak is the beginners favorite as you get a lot of meat for the money. I was learning
to grill Round Steaks when I was about
11 years old. The New York Strip Steak and Flat Iron Steaks are good choices for
most people. When selecting the meat one of the key things you are looking for is called the "marbling". This is very
fine fat laced through the meat. When you grill the meat this will tend to melt
and add flavor. Never trim off the fat
that the steak comes with as it will be just enough to add flavor.
It is always better to purchase your steak just before you grill it if you can. If you freeze a steak it isn't thought
to be as good as one that hasn't been frozen. If you want to marinade it should be placed in a zip lock plastic bag with your
choice of marinade over night or at least for
a few hours in the refrigerator before grilling it. There are bottled marinades
available at the store or you can even use a bottle of Zesty Italian salad dressing as the marinade. Just try to get all the
air out of the plastic bag so the meat is not in contact with any air....just liquid.
Here is a marinade you can make easily and it gives good results. You may try this on a piece of Round Steak or Flank
Steak. Or the less expensive pieces you can find just to experiment.
2 cloves of garlic minced fine
juice from 1 lime or lemon and 1/2 cup pineapple or apple juice mixed together,
your choice
2 Tbs Worchestershire sauce
1 Tbs coarse black pepper
1 Tbs brown sugar
1 tsp seasoned salt or sea
salt
So with your grill set up, your charcoal alight and burning hot it's time to put the meat on the fire. You may hold
your hand over the fire and if you can hold it at a level where you can say.... Mississippi one, Mississippi two, Mississippi
three...that is the right height to set the grill grate. Let it get hot and oil it with the tongs and the paper towel dipped
in a little vegetable oil. Then place
your steak on the grill cold and right out of the fridge. If you have an open grill
and want to produce
some smoke, you can take wood chips you can buy where you get your charcoal and soak them a minute
or so
in water and drain them, roll them up in foil and poke holes in the top. You only need a small amount
to fill
the palm of your hand. Place this on top of the hot charcoal before installing the grill grate.
Your fire should be burning
7 to 10 minutes before spreading the coals out some to make a bed of coals
somewhat loosely packed together so you'll have
a hot fire. If your grill doesn't have a lid or is
a hibachi type, you can make a tent of foil or use a foil cooking tray
that is large enough to cover it.
This will help to impart the smoke flavor. And remember you don't want too much of that
as it will over
power the flavors of the meat.
With the grill grate placed over the fire and oiled, place the meat on the grill and allow it to heat
for about eight
minutes for a medium doneness. You could use less time for rare and longer for well done.
When the time is up for the first
side, turn the steak to cook the other side. Only turn the steak once.
When the time is up for the second side you may
cut into the steak with a knife to inspect the donenes in
the center. As for seasoning the steak when on the fire you may
want to use a rub type seasoning like the
Montreal Steak seasoning or any of the knock offs other companies make of it.
Even the Dollar stores
varieties are less expensive than you can buy the individual spices and make it. (it contains, garlic
powder,
coriander seed, coarse Kosher salt, dill weed, paprika, crushed red pepper flakes, and coarse
black pepper)
If you have a meat thermometer, the rare steak should be grilled to 130 F, the medium to about 150 F, and the
well
done steak to just about 170 degrees.
Once you take the meat off the grill, it should set on a plate and rest for up to five minutes before serving.
As for things that would accompany a steak, a baked potato wrapped in foil and baked in the oven is good when
served
with sour cream, butter, and chives. Another item is Mushrooms. If you buy a box of these at the store
you should brush
them off with a soft brush and wipe them off with a wet cloth. If you run water over them they will need to sit for about
4 hours in order to drain well. I cut just the bottom off the stem to trim it and then slice mine in halves or quarters depending
on the size. If they are large you could slice them in one quarter inch cuts. Now, while the steak rest....remember that foil
or the foil tray used to cover the meat for the smoke ? Turn it right side up with the grill placed down low on top of the
fire and put a stick of butter in it to melt it. When the butter is melted but before it turns brown add the mushrooms and
stir them around and turn them. Season them with garlic powder and heat them till the edges crisp and they will be done and
ready to serve. A lettuce salad with tomato, cucumber is always a good accompaniment.
Pork Lion
Pork Lions are very tasty and can be stuffed with various
other food items. Then tied with butchers twine so that it
can be grilled or smoked. Like any meat for the grill, it
should be brined over night before beginning to prep it for cooking.
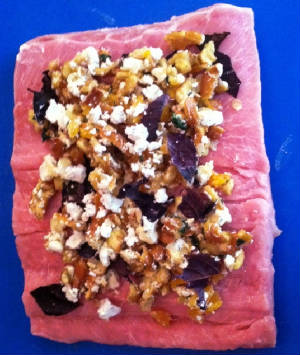
This tutorial will walk you through it. You will have to
have a long sharp knife to cut into the Lion and turn it
as you cut it to roll it out flat. Then the stuffing is added and the Lion is rolled up again. Strips of
Butchers Twine
are used to tie it closed for cooking. The exterior usually has a seasoned rub applied to it.
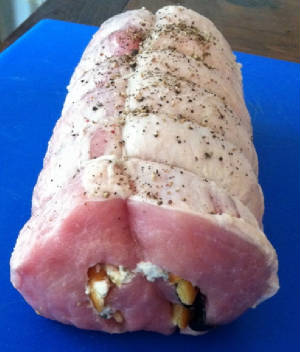
Now the Pork Lion is ready for the grill or smoker. A kitchen Oven
can also be used. This needs to have a drip
pan under it to save the juices.
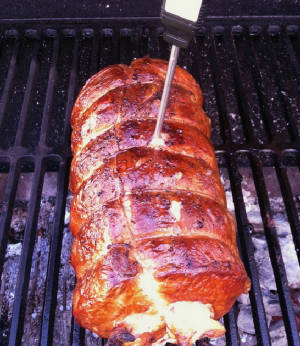
Here is the Lion after several hours on the smoker. A thermometer
is inserted to the center to check the temperature to determine if it is fully cooked and safe to
serve.
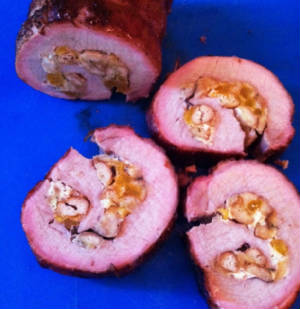
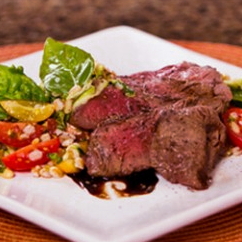
Here the Lion is cut and ready to serve. Notice the purple
ring at the outer edge of the Pork. This is called a "smoke
ring" and it is the penetration of the smoke into the flesh
and it imparts great amounts of flavor to it. The Lion may
be finished with BBQ sauce if one wants or it could even
be wrapped with strips of bacon before cooking. Stuffings
can be any numbers of vegetables, breads, or even other
types of meat such as bacon.
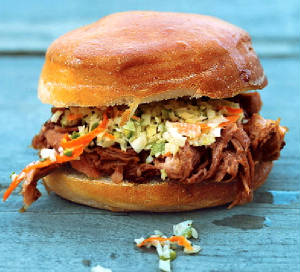
Low and Slow Pulled Pork
Recipe for 10 to 12
1/2 Cup Sugar
1/4 Cup Kosher Salt
1 Tb Smoked Paprika
1 TB Cayenne Pepper
2 Tsp Ground Cumin
1/2 Tsp ground Celery salt
1/2 Tsp Mustard powder
8 1/2 Lb Boston Butt Pork Shoulder
10 to 12 Hamburger Buns
To make the dry rub, mix together the
Sugar, Salt, Paprika, Cayenne, Cumin, Celery
Seed, and Mustard Powder.
Reserve 4 TB for serving later on.
Gently rub the Pork Shoulder with the seasoning
and cover with plastic wrap
Refrigerate for at least 4 hours or up to 1 day in
advance
Preheat the Smoker or Grill to 275 F and set
Pork in a roasting pan and place in the smoker
with the fat side facing up an cook until tender
for about 8 hours or until interior temp of meat
is at the 175 F level. Once the meat is tender
remove from Smoker and allow it to rest for
20 minutes before shredding.
Pile each bun with some Pork, BBQ sauce & Slaw.
Serve with extra rub.
Sauce for the Pulled Pork
1 1/2 Cup Ketchup
1/2 Cup Apple-Cider Vinegar
3 TB Sugar
1 Tb Worcehstershire Sauce
1 1/2 tsp garlic powder
1 tsp paprika
1 tsp cayenne
1/2 tsp liquid smoke
Combine all ingredients in a sauce pan and simmer
for 10 minutes. Mix to taste with Pork. The sauce can be stored in the refrigerator for 2 weeks.
Other Options
There are any number of other things that can be prepared on a grill or
in a smoker. Stuffed hamburger
patties are becoming more popular as inexpensive plastic
burger presses are coming onto the market. Skishkabobs
are a summer time favorite as well. Of course hot dogs
and sausages such as Bratwurst, Metwurst, Knockwurst,
or even Polish sausage will all grill easily and absorb the smoke flavor the fire in the grill produces. Fish lovers
often grill Salmon and other fish which is a bit more dense
in texture. Shellfish such as Shrimp are often threaded onto a wooden skewer. It's all in what a person
wants to try.
|
|
|