|
PicPick screen shot and design software is a free ap
that is very easy to use and this tutorial will aid in learning to use it.
You can download it here:
PicPick Screen Shot Free
It will install this screen Icon on the desk top.

When you click the Icon a smaller icon will appear in
the tool tray. This is where you will launch the program
from.

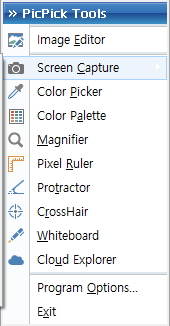
When you click the small Icon in the tool tray you will get the PicPick Tool Menu. It will appear just above the
small Icon. Select Image Editor at the top to launch the
PicPick program.

This will launch the editing desk top
To use the program once you have it on the screen, minimize it to the tool tray. Bring the image you wish
to edit to the desk top. It may be something in a web site, in the pictures view of your hard drive, or something
on a jump drive in the USB. Once it is on the screen enlarge the PicPick program over top of it. It is now
set to capture an image to the working desk top to be edited. The next step will be to go to the upper left where you
will see a small blue box with a white drop down arrow. Click the aarow to get the menu and select, "capture full screen".
The image on the desk top will now appear on the work
table in the PicPick editor. It can be moved around using the mouse to control the "hand" that grips the image
when the left mouse key is depressed.
The first tool you will want to use is the "Select" tool.
Click it so you can then scroll across your image holding down on the left mouse key to select the area around the image
you wish to cut out. Once this step is complete you can click on the word "crop" and the area you selected will be all
that remains on the work table area. You can then click on the aarow below
"Effects" to get a menu of operations you can use to
adjust your selection further.
Color can be adjusted, lines, aarows, and other operations can now be rendered. This program doesn't
allow you to use layers but you can use the "resize" and keep the same aspect ratio of your image which is great
for making small Avatars.
The blue box at the upper left with the drop down menu
contains the "Save As" command and you can select any of the five types of file extension you wish to save the graphic
or photo as.
This program is rather intuitive and doesn't have a steep
learning curve. You can visit the PicPic site by clicking the link for the free download to read more about using
it.
Note: Remember to right click and EXIT the small Icon in the tool tray when you are done. Otherwise
you will not be able to shut down your computer.
|

